Wednesday, December 1, 2010

Christmas Trees


Have you ever wondered how to make your tree look professional without having to spend a fortune on the trimmings and hours on end decorating? Let me share with you some tips and tricks an employee of Jimmy's Floral in Layton shared with me last year.

1. Don't be nit-picky!!! Absolutely, positively forbid yourself from tweaking that ribbon after it's on the tree. (Exception: if your tree is completely unbalanced with, say, ALL the ribbon on the top half, you can take it off and start again. Unless, of course, you purposefully keep the lower half bare due to curious young children...) It's your choice: spend hours trying to make everything look just right, or quickly throw the trimmings on the tree (pretty much haphazardly) and have it turn out looking more professional.

2. Just keep going. At first you will doubt that anything looking like this will ever be remotely pretty. But keep going! There is a magical moment awaiting you--the moment when suddenly your tree is absolutely gorgeous. It really does happen suddenly. You'll be surprised.

3. Don't be afraid to use LARGE items.
You'll be surprised how well they actually fit. Tucking huge ornaments, stuffed animals, bird houses, etc. into the branches of your tree adds great variety and interest.
4. Variety is your friend. Using both shiny and matte finishes adds a lot of depth. Use both rough and smooth textures. Experiment with different shapes. Pretty much anything goes.

5. Shop the after-Christmas sales. As long as you don't mind being "a year behind" in the fashion trends, wait until after Christmas to get the trimmings for your next tree (or to find a few more pieces to add to the tree you already love). I recommend Tai Pan Trading as a great place to find quality items for super cheap. I got enough trimmings to completely fill my little 6 foot tree and make a nice wreath to match for under $50. I also went to the local Joann craft store to find some inexpensive floral picks after the holidays.


OK, now it's time for some step-by-step instructions. You ready?

1. Choose your color scheme and gather your trimmings. Find something you love and build your colors around it. I found a ribbon I loved and used that...I ended up with a bronze/orange/magenta/red/gold theme. Sounds strange, but it turned out very pretty! Using floral picks is a great way to add variety to your tree. I found poinsettias and some glittery leaves that fit perfectly into my color scheme.
Trimmings checklist:
(depends on size of tree...the first numbers are what I used on my 6 foot tree)
  • 15-30 floral picks (each "bush" comes with multiple picks)
  • 30-70 yards of ribbon
  • 10-30 large ornaments
  • 20-40 medium ornaments
  • 20-40 small ornaments
  • any specialty items you wish to include (a lady in my neighborhood has a cute rustic ladder she props in her tree. We put teddy bears on my mom's tree last year. Like I said, anything goes!)
2. Decide on white or colored lights. I chose multicolored so the warm hues of my ornaments would be emphasized. White lights are more popular these days and can be used with any color scheme.

3. Add the ribbon. Tie one end of your ribbon to the top of your tree. Work in a loosely circular motion around your tree, weaving up and down as you circle the tree. Tuck some parts of the ribbon deep into the branches and leave other portions at the surface. Avoid being symmetrical. It should look something like this:
If you have 2 0r more types of ribbon, you can either put them on separately or tie them together and apply all at once.

4. Add floral picks. Simply tuck the picks into the branches of your tree. This should take all of 2 minutes. (If it takes longer, you're being too nit-picky!) Avoid symmetry. Don't space them evenly all over the tree. Tuck one here, a group of 2-3 there...

5. Add ornaments and special items, starting with your largest. Work from biggest to smallest. Tuck some ornaments deep in the branches to add a sense of depth to your tree. Don't be afraid to put some large items toward the top, but definitely keep most of them on the lower 2/3 of the tree.

(Sorry these photos aren't the best...they really don't do justice to the beauty of the finished product!)

HAPPY DECORATING!!!

Sunday, May 23, 2010

Bridal Bouquet

Here is a link to a video that shows the bridal bouquet I did recently (and forgot to take photos of!). The video/photos are done by Wayman Studio (www.waymanstudio.com). I definitely recommend them! They did my little brother's wedding photography, and everything turned out beautifully.

Wednesday, May 5, 2010

Website links

Since I can't scan in and post all the floral examples I have from my books and magazines, I thought it would be nice to provide an online source of other people's floral portfolios for your viewing pleasure. It is interesting to see the different styles and color choices. Looking at a variety of options may just help you find something you love (and that might even be something you never expected to love).

Rebecca's Silver Rose

http://www.rebeccassilverrose.com/weddings/bridal-bouquets/

I really like that this website is easy to navigate and has a good variety of floral work. Notice she has sections for bouquets, wearables, cakes, centerpieces, etc. Take a look and see what you like!

Bella Floral Design

http://www.bellafloraldesign.com/#

Great photography and fun ideas! I liked both the website and the blog.

Fleurs de France

http://www.fleursfrance.com/portfolio

WIDE variety of bold colors and flower combinations. I really like a lot of these bouquets, boutonnieres, and cakes. Go to the "portfolio" tab and navigate through the "personal flowers" and "weddings" sections.


I will be on the lookout for more portfolios to share. Like in most things, seeing someone else's work can help inspire your own to be better!

Cascading Bouquets

Well, I just made a beautiful cascading bouquet with yellow lilies and spray roses, pale green carnations, and stephanotis with purple pearl pin accents....but alas! I forgot to take a photo before delivering it. So hopefully the bride will save a photo for me. :) Good thing I get to re-create the bouquet for her wedding day in a few weeks.

To see some examples of cascading bouquets, follow the link below:

http://images.google.com/imgres?imgurl=http://www.links2love.com/love/romance/wedding/calla_cascade.jpg&imgrefurl=http://www.links2love.com/wedding_bouquets_3.htm&usg=__k0NgQa-nsimz0fkL3K89bnZi-SU=&h=283&w=230&sz=9&hl=en&start=36&um=1&itbs=1&tbnid=jnzgR4hQiX1uFM:&tbnh=114&tbnw=93&prev=/images%3Fq%3Dcascading%2Bbridal%2Bbouquets%26start%3D20%26um%3D1%26hl%3Den%26safe%3Dactive%26sa%3DN%26ndsp%3D20%26tbs%3Disch:1


Good examples of cascading bouquets are harder to find online, but I'll post any more that I find! And let me know if you find any, too.

Cascading bouquets are generally arranged into a bouquet holder (basically a floral foam ball in a plastic holder with a handle). This makes them easy to hold and keeps the flowers hydrated. Cascading bouquets are also "faced", meaning they are meant to be viewed from one direction. Because you don't need flowers on the back side, you can have a larger bouquet for not much more money than you'd spend on a traditional hand-tied bouquet. They use about the same amount of flowers!

There are several types of cascading bouquets, ranging from the traditional "tear drop" shape (full and round at the top and tapering toward the bottom) to modern varieties with a few individual flowers forming the cascade and lending a more "airy" look to the bouquet.

Thursday, April 29, 2010

Cupcake cakes


My friend Casey's wedding cake. A 3-tiered cupcake extravaganza! She purchased the cardboard base, mod podged it with coordinating scrapbook paper, made beautiful cupcakes with "pearl" sprinkles, and arranged it all to look very elegant. We added a garland of flowers around the bottom layer, and placed little groups of flowers on the other tiers. It turned out BEAUTIFULLY. Once again, I wish I had a better camera. These photos don't really do it justice.

Cupcake cakes are a lower-cost alternative to traditional wedding cakes. They are just as beautiful and have tons of character, PLUS the added bonus of not having to slice the cake for your guests.

Wednesday, April 28, 2010

Speaking of fun cake toppers...


Here are the cake toppers from my wedding. Aren't they cute? :)

Tuesday, April 27, 2010

Erk and Sara's Wedding continued....


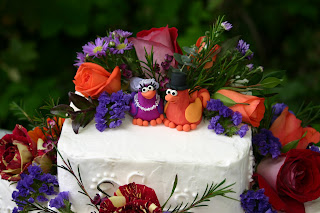
Consider adding character to your cake by making your own cake toppers! These frogs are a cute way to show a fun family joke that has been going on for years. It represents the couple and can also spark some curiosity.


Mom's corsage with white lisianthus and freesia buds tied with silver ribbon. The angle of this photo makes the corsage look kinda big, but never fear! It was a very nice, medium-sized corsage that didn't overpower the wearer.


Sister's wrist corsages were made with freesia buds, delphinium, and greenery (Italian ruscus) tied to a bracelet of silver wire.


The bracelets are hand made by twisting and flattening the wire and will fit to any sized wrist by simply bending it into place. Easy. Comfortable. Doesn't cut off your circulation like those elastic ones we all wore to dances. Nice!


Men's boutonniere features a lisianthus bud, hypericum berries, and Italian ruscus.

These are simple, stylish, and small enough for even my husband to be comfortable wearing it. If you have people in your wedding party that absolutely detest wearing LARGE corsages or boutonnieres, this is a great option!

More Wedding Bouquets (Erk and Sara's wedding)

In December 2009 my little brother got married. I got to do their flowers. So fun! The colors were midnight blue and silver (and not just because they are Aggie fans....) so for the bouquet we had a base of white roses, anemones, lisianthus, and lilies; blue accents of delphinium and thistle; and silver incorporated with wire accents. A "collar" of shimmery, delicate-looking bullion wire surrounded the bouquet, and the handle was wrapped with thick silver oasis wire. I really love the dark green aspidistra leaves that form the framework for this bouquet. They give a nice, clean, smooth finishing touch to a traditional hand-tied bouquet.


They were married on one of the (most unexpectedly) coldest and snowiest days of the whole winter, which was very unfortunate for the lilies. The bride's bouquet (which included those beautiful lilies) just couldn't handle being out in the extreme cold for all those photos after the ceremony, so it was replaced with another (hurriedly assembled!) bouquet for the reception. Unfortunately, there were not enough lilies left over to include them in her 2nd bouquet. Lesson learned: always plan for inclement weather when ordering flowers. It's much better to have too many rather than too few! You can always find places to use the extra flowers.


The groom's boutonniere was made with white freesia, blue delphinium, and a few green hypericum berries tied with a silver ribbon. Other boutonnieres and corsages (for moms, dads, etc) used white lisianthus instead of the freesia. Lisianthus is a wonderfully long-lasting flower and looks somewhat like a rose.


Several small arrangements were placed in groupings around photos that were on display at the reception and open house. Using multiple small groupings helps soften up the corners of photos while being small enough to not distract from the portrait. Using the same amount of flowers in one arrangement would have been overpowering, indeed! :)

This is one of my favorite small arrangements. A small decorative glass tumbler with a few lilies (the ones whose stems broke off, rendering them useless for a larger arrangement or bouquet) with a few cut sprigs of lily grass. It is eye-catching with it's clean, bold lines, and would fit wonderfully in with other tropical arrangements.

Tuesday, April 20, 2010

Color swatches

An easy way to coordinate your exact colors is to go to the local hardware/paint store and pick up some free paint color swatches. Get a few--a set for you, your florist, your dressmaker, and any other people helping with your wedding decorations. This helps guarantee you won't have any extreme clashes in color (I have seen some yellows that just DO NOT go together, haven't you?).

Tuesday, April 13, 2010

Weddings


One of the biggest floral occasions is a wedding. Did you know that in some parts of the country, people spend upwards of $5,000-$10,000 on wedding flowers? It's amazing. (I think I'd rather use that money for something else like a SUPER fun trip or a down payment on a home, but that's just me. Ha ha!).
In any case, flowers are definitely a focal point of most wedding celebrations. I specialize in wedding bouquets, corsages, boutonnieres, centerpieces, and cake flowers. And you get the whole package for $300-$600, depending on your flower choice and how big you want to go.


BOUQUETS

A bride's biggest flower concern is probably her bouquet. It should be stunning, spectacular, fitting to her personality, and with all that, not too heavy to hold for a few hours at a time. If you have a favorite flower, see if it is available in your wedding colors and incorporate it into your bouquet. There are SO MANY different styles of bridal bouquets out there. Find something you love. Don't be afraid to try something different.


The classic hand tied bouquet is a favorite of many brides. Any combo of colors and textures can be combined to make a unique, beautiful bouquet. This one (made for my friend Casey earlier this year--her colors were gold and sage green) features a mix of white roses, gerbera daisies, wax flower, and lily grass (those are the little "spiky" greens sticking out).

One of my favorite things about this bouquet is the wire accents. I used crinkly gold wire to make a "collar" around the base of the bouquet, adding a little soft sparkling effect. Then the stems are wrapped with thick gold wire instead of ribbon. This gives a clean, bold look. Curly-Q wire accents are also placed throughout the bouquet to add interest and incorporate the gold color throughout the bouquet. It turned out VERY pretty! I really wish photos would do more justice to flowers. (I might just need to get a nicer camera!)


If you have chosen wedding colors that are a little tricky to match with flowers, do not fret! This is where the ribbon, decorative wire, and other accents come in. You can use a "neutral-ish" colored flower like white or pale green for the bulk of your bouquet, then accent it with your wedding colors. You can also use special floral spray paint to achieve non-traditional flower colors. And I don't just mean the super bright, fake-looking neon colors you see on mums around holidays (though if you love that bright, fun look, by all means, use it!). There are several beautiful natural-looking options with browns, purples, oranges, etc. that will leave people wondering where in the world you found that color of flower. If done correctly, even the bright, bold colors come out beautifully. Though I usually recommend keeping flowers as natural-looking as possible. :)


Variations on the hand tied bouquet can give you a long, elegant, simplistic look. These can still be dressed up a bit with ribbon or wire accents while keeping their simple beauty.


Check back soon for more examples of bouquets! The options really are endless, but I hope to give you a small taste of the basic varieties!


Monday, April 12, 2010

WELCOME!!! I hope this blog is a useful tool for you as you look for creative ideas and inspiration for your big events (or even the small ones--they're important, too!).

In this blog I will not only post examples of my own work, but will also show you the fun, eye-catching ideas I find from other sources. I think the more you have to look at, the more likely you'll find something you love. And that is what matters.

Look for floral examples for weddings, sympathy, home decor (silk arrangements), prom, centerpieces, holiday, and those everyday "I'm thinking of you" arrangements. And since decor for your events is not just limited to flowers, I'll also throw in some ideas of other centerpieces and decor.

Remember that there is more to flowers than just the flowers. I will give tips on how to best care for your flowers, how to choose colors, what flowers are available during the different seasons, which seasons are "flower seasons" (and thus EVERY flower is more expensive---probably best not to order massive amounts of flowers while the prices are up), etc.

I know flowers can be PRICEY. Something so beautiful shouldn't have to break your budget or cause you all that extra stress, so I am committed to giving you a fair price for the best quality floral work! So if you like what you see and would like my help, give me a call or email.

Thanks!

Heather Thomas
801-618-8044
heathandthomas@gmail.com